Mastering SvelteKit Deployment: Deploying to Cloudflare
- SvelteKit
- Deployment
- Cloudflare
- Cloudflare Pages
- Cloudflare Workers
- Cloudflare KV
- ISR
Published on
In part 3, we deployed our SvelteKit app to Vercel. We have gotten into details that were abstracted from us to gain more knowledge. In this part, we will explore the worldwide popular Cloudflare platform. We will dive deep at a lower level, and it will be an enjoyable experience. Let’s get started!
What is Cloudflare
Cloudflare is an edge-powered distributed network that aims to serve secure and more performant web applications. It won the dignity in the web world as one of the biggest networks, serving millions of requests every second.
One of the well-known services offered by this platform is Cloudflare Workers, A Serverless solution that allows for deploying web applications across the edge, bringing them closer to the user for a significant improvement in loading speeds and availability. Its successor - Cloudflare Pages offers substantial support for static and dynamic web applications by integrating with different Cloudflare services in an automated way as needed.
In this blog post, we will deploy our app to CloudFlare Pages and empower it to offer ISR support which will allow us to experience the lower level Cloudflare Workers service. In the end we will deploy a pure static version of our website to CloudFlare Pages. Prepare your coffee, and bear with me
Cloudflare Edge Network
Cloudflare has hundreds of Data Centers on the world for serving web applications (services) deployed to their platform using the Serverless architecture, and by running every service on every data center, any user vising you website will receive a response from the closest location, which significantly reduces the latency and make your web app experience feel faster. We know this as the Cloudflare Edge Network and it’s one of the biggest reasons to deploy your web app to Cloudflare.
Cloudflare Workers
When you heard the word Serverless, your thought may be that it will be slow, that’s because we have always been told that the Serverless architecture spans up containers that take seconds to load on the first visit, known as “cold starts”. Cloudflare Workers solved this problem using their Isolates technology. In short, Isolates are lightweight nodes running over the edge using V8 engine, being tiny and efficient minimizes the cold starts down to 5 milliseconds or fewer (It’s technically zero, see the notes below).
In Part 3 we have mentioned Vercel’s Edge Runtime feature, they are doing the same thing as Cloudflare Isolates technology but with different branding.
Cloudflare has even gotten this to the next level by starting up the isolate as soon as the TLS handshake process starts its execution. By doing this, they were able to minimize the startup time down to 0 milliseconds! For more details, see this article on Cloudflare blog.
Cloudflare CDN
It’s likely that your website has static assets such as images, videos, markdown files…etc. For SvelteKit, you would often add your static assets to the static directory. Accessing those files from your server URL is easy to do. For example, we could access our favicon using [APP_URL]/favicon.ico.
Those files are in your server, nowhere else. Now imagine a lot of users requesting those static assets from your server. This is a lot of traffic that can exhaust the server and increase latency. In addition, your server exists in one location, the more the distance between your user and the server, the greater the latency, thus your website will feel slower. Let’s say, for example, we have a server in Frankfurt and a user visiting it from Japan. We don’t want this huge trip to load our assets. What’s the solution?
Use a Cloud Delivery Platform - CDN! It’s a layer between your server and the users. A CDN will distribute your static assets all over the globe, and some CDNs will also cache your assets for you. Cloudflare CDN is one of those services, which is identified as a CDN Cache - It performs content distribution & Caching, minimizing loading time and speeding up your assets delivery.
Deploying to Cloudflare pages
Pages is the fastest way to deploy your web app to Cloudflare. It offers an automated Git integration that connects to your repo with auto-deployment and previews URL support. The great thing about this service is that it auto-configures everything you need for you on your behalf, you will get your app deployed to Cloudflare’s Edge Network, it will also cache and distribute your static assets on Cloudflare CDN.
Pages support both static websites and dynamic apps, and the latter is done by an automated integration with Cloudflare Workers. This section will use adapter-cloudflare, which adapts your SvelteKit app to Cloudflare Functions API . This adapter is suitable for the whole dynamic version of our example app. We will cover the static version in a later part of this article.
If you have already forked the example app repo, checkout the
cloudflarebranch
Let’s begin by installing the adapter:
pnpm i -D @sveltejs/adapter-cloudflareThen update svelte.config.js:
import adapter from '@sveltejs/adapter-cloudflare';
import { vitePreprocess } from '@sveltejs/kit/vite';

/** @type {import('@sveltejs/kit').Config} */

const config = {
	preprocess: vitePreprocess(),
	kit: {
		adapter: adapter()
	}
};

export default config;
Let’s have some fun and explore the build output of this adapter:
pnpm build
Expand the content of the .svelte-kit/cloudflare directory. And you will notice a file tree similar to the following:
.svelte-kit/cloudflare

├── 404.html
├── _app
│ ├──  immutable
│ │  ├──  assets
│ │  │  └──  *.css
│ │  ├──  chunks
│ │  │  └──  *.js
│ │  ├──  entry
│ │  │  └──  *.js
│ │  └──  nodes
│ │  └──  *.js
│ └──  version.json
├── _headers
├── _routes.json
├── _worker.js
├── _worker.js.map
├── favicon.png
├── ssg
│ └──  __data.json
└── ssg.html
The
_app/immutabledirectory contains your compiled Vite output. Your browser will cache those for you because of the specified cache header by Vite. Don’t worry, the files are fingerprinted for you!assetscontain your static assets served by Vite. This differs from files inside thestaticdirectory (which SvelteKit doesn’t expose aCache-Controlheader for).chunkscontain your compiled Svelte components separated into chunks.nodeshandle the server-side rendering of your app. It imports the files from thechunksdirectory to render in the server.entryhas the files that start up your web app, as the name shows, the entry point of your app, which imports files fromassetsandnodesandchunksto get your app running on both client and server-side.The
headersfile contains headers for the_appdirectory. It exposes aCache-Controlof31536000 secondsor1 yearto be cached locally in the browser. Note that with Cloudflare, we have both browser and CDN caching. The CDN is distributed over Cloudflare’s edge network, so you get your app’s maximum network performance boost.The
_routes.jsonand_worker.*are Cloudflare-specific files following the (Cloudflare functions routing API) which are all part of Cloudflare workers API, that’s right! With dynamic applications like our app, Cloudflare Pages will integrate with Cloudflare Workers offering SSR support.The rest of the files are our static assets and static data. We have explained those in Part 2 of the series.
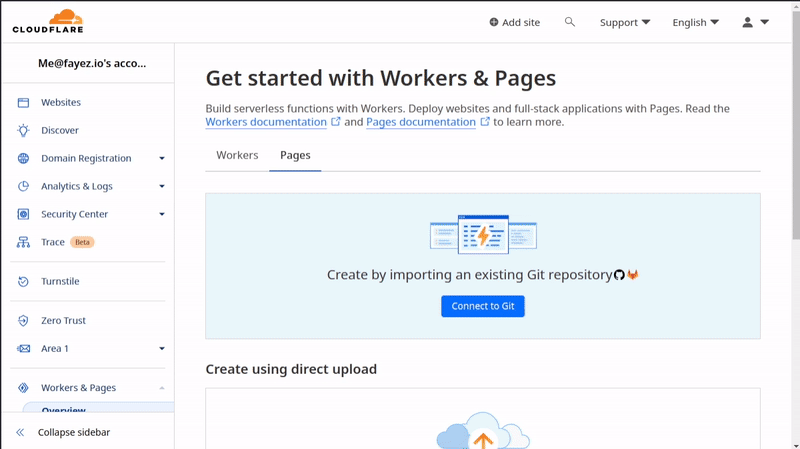
Now, let’s see that working in action and deploy our app to Cloudflare. Sign up to Cloudflare, verify your email, and head to the Dashboard. In the sidebar navigation, choose Workers & Pages. click the Pages tab and click on Connect to Git, and choose our example app repo. Once Cloudflare redirects you back, you need to enter the project name, select cloudflare branch, select SvelteKit for the framework preset, and set the build command to pnpm build.
We also need to add the Environment Variables for our app, copy them from the .env file in our example app repo, then finally click Save and Deploy
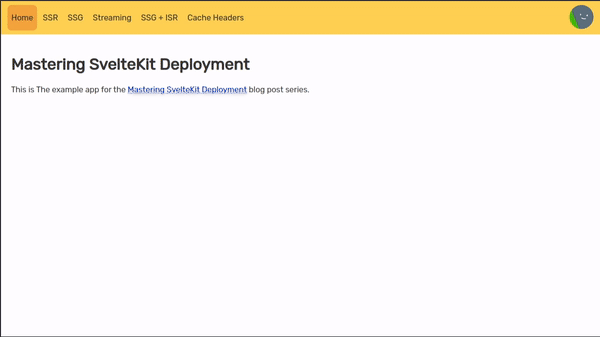
And we get our app deployed
We see our example web app is working well. The ISR page, however, wasn’t working as expected, it behaves completely as an SSR page. That’s because, unlike Vercel, the Cloudflare adapter does not offer ISR support out of the box, and the page specific config option will be ignored.
Adding ISR support to CloudFlare adapter
In Part 3 of the series, we explored the Incremental Static Generation and how well Vercel supports it. CloudFlare, however, doesn’t support this option out of the box, but it turned out that we could easily achieve it.
What is ISR?
ISR (or Incremental Static Regeneration) allows your deployed web page to be static with the ability to regenerate it in an interval of your choice.
Let’s give an example with and without ISR:
say you have a blog page that fetches your content from a headless CMS. You want your blog loaded as fast as possible, so deploying it as a static page is your best option for maximum performance.
Without ISR
You add the export const prerender = true to your page. This way, it will be generated at build time, but that’s the end. Even if you update your content, the load function will never rerun unless you redeploy your app, so your website will be outdated.
With ISR
With ISR, instead of pre-rendering your page at built time, you generate the static page on demand as soon as it’s visited. The first visit to your webpage will use SSR, and the result of the load function will be globally saved for a specified interval. Once the interval has expired, it will automatically regenerate on the next visit.
Don’t mislead ISR with browser Caching headers. Those will cache the page on the user’s browser for a specified amount of time upon the first visit. ISR caches them globally for all users for a specified period.
Unlike pure static websites, ISR requires a server in order to work. So you must not prerender the web page where you intend to use ISR on.
How to achieve ISR on Cloudflare
At the time of writing this post, there is no adapter that offers ISR support for SvelteKit, so we are going to write our own on the same project!
We can use Cloudflare KV. key value store to cache ISR pages on our example app. The great thing about KV is that you can store everything you need on it, including page content! And we can specify an expiration date for each key/value pair, which we will set to be the same as the ISR page expiration property.
You can see the result of our work in this section in the
cloudflare-isrbranch, which we are going to deploy at the end of the section.
Let’s begin by removing the cloudflare adapter:
pnpm remove @sveltejs/adapter-cloudflareNext, create a directory inside the root of the project. Let’s call it cloudflare. We are going to have 2 files in this directory:
index.js: Iterates through your SvelteKit’s routes and build an output file for each, respecting the configs passed to the adapter. In addition, this file outputs a
manifestfile containing deployment variables/configs for Cloudflare to read.files/worker.js: Cloudflare specific file for our deployed app, as the name hints, it follows Cloudflare Workers Runtime APIs, which is internally used by Cloudflare Pages under the scenes.
mkdir cloudflareCode in this section are originally taken from the official Cloudflare Adapter sub-repo of SvelteKit GitHub repository.
cd cloudflare
touch index.js
mkdir files
touch files/worker.js
Paste this code on the file index.js:
import { writeFileSync } from 'node:fs';
import * as path from 'node:path';
import { fileURLToPath } from 'node:url';
import * as esbuild from 'esbuild';

/** @type {import('./index.js').default} */

export default function (defaults = {}) {
	return {
		name: '@sveltejs/adapter-cloudflare',
		async adapt(builder) {
			const files = fileURLToPath(new URL('./files', import.meta.url).href);

			const dest = builder.getBuildDirectory('cloudflare');
			const tmp = builder.getBuildDirectory('cloudflare-tmp');
			builder.rimraf(dest);
			builder.rimraf(tmp);
			builder.mkdirp(tmp); // generate 404.html first which can then be overridden by prerendering, if the user defined such a page
			await builder.generateFallback(path.join(dest, '404.html'));
			const dest_dir = `${dest}${builder.config.kit.paths.base}`;
			const written_files = builder.writeClient(dest_dir);
			builder.writePrerendered(dest_dir);
			const relativePath = path.posix.relative(tmp, builder.getServerDirectory());

			const isr = [];
			for (const route of builder.routes) {
				const config = { ...defaults, ...route.config }; // Add pages with isr config to the isr array, to be exported later.

				if (config.isr) {
					isr.push({
						pathname: route.id,
						expiration: config.isr.expiration
					});
				}
			}

			writeFileSync(
				`${tmp}/manifest.js`,
				`export const manifest = ${builder.generateManifest({ relativePath })};\n\n` +
					`export const prerendered = new Set(${JSON.stringify(builder.prerendered.paths)});\n` +
					`export const isr = ${JSON.stringify(isr)};\n`
			);

			writeFileSync(
				`${dest}/_routes.json`,
				JSON.stringify(get_routes_json(builder, written_files, defaults.routes ?? {}), null, '\t')
			);

			writeFileSync(`${dest}/_headers`, generate_headers(builder.getAppPath()), { flag: 'a' });
			builder.copy(`${files}/worker.js`, `${tmp}/_worker.js`, {
				replace: {
					SERVER: `${relativePath}/index.js`,
					MANIFEST: './manifest.js'
				}
			});

			await esbuild.build({
				platform: 'browser',
				conditions: ['worker', 'browser'],
				sourcemap: 'linked',
				target: 'es2022',
				entryPoints: [`${tmp}/_worker.js`],
				outfile: `${dest}/_worker.js`,
				allowOverwrite: true,
				format: 'esm',
				bundle: true,
				loader: {
					'.wasm': 'copy'
				},
				external: ['cloudflare:*']
			});
		}
	};
}

/**
 * @param {import('@sveltejs/kit').Builder} builder
 * @param {string[]} assets
 * @param {import('./index.js').AdapterOptions['routes']} routes
 * @returns {import('./index.js').RoutesJSONSpec}
 */

function get_routes_json(builder, assets, { include = ['/*'], exclude = ['<all>'] }) {
	if (!Array.isArray(include) || !Array.isArray(exclude)) {
		throw new Error('routes.include and routes.exclude must be arrays');
	}

	if (include.length === 0) {
		throw new Error('routes.include must contain at least one route');
	}

	if (include.length > 100) {
		throw new Error('routes.include must contain 100 or fewer routes');
	}

	exclude = exclude

		.flatMap((rule) => (rule === '<all>' ? ['<build>', '<files>', '<prerendered>'] : rule))

		.flatMap((rule) => {
			if (rule === '<build>') {
				return `/${builder.getAppPath()}/*`;
			}

			if (rule === '<files>') {
				return assets
					.filter(
						(file) =>
							!(
								file.startsWith(`${builder.config.kit.appDir}/`) ||
								file === '_headers' ||
								file === '_redirects'
							)
					)
					.map((file) => `/${file}`);
			}

			if (rule === '<prerendered>') {
				const prerendered = [];

				for (const path of builder.prerendered.paths) {
					if (!builder.prerendered.redirects.has(path)) {
						prerendered.push(path);
					}
				}

				return prerendered;
			}

			return rule;
		});

	const excess = include.length + exclude.length - 100;

	if (excess > 0) {
		const message = `Function includes/excludes exceeds _routes.json limits (see https://developers.cloudflare.com/pages/platform/functions/routing/#limits). Dropping ${excess} exclude rules — this will cause unnecessary function invocations.`;

		builder.log.warn(message);
		exclude.length -= excess;
	}

	return {
		version: 1,
		description: 'Generated by @sveltejs/adapter-cloudflare',
		include,
		exclude
	};
}

/** @param {string} app_dir */

function generate_headers(app_dir) {
	return `

# === START AUTOGENERATED SVELTE IMMUTABLE HEADERS ===
/${app_dir}/*
  X-Robots-Tag: noindex
 Cache-Control: no-cache
/${app_dir}/immutable/*
  ! Cache-Control
 Cache-Control: public, immutable, max-age=31536000
# === END AUTOGENERATED SVELTE IMMUTABLE HEADERS ===
`.trimEnd();
}
This file builds and does the initial setup for our app using esbuild (which is used by vite internally). In this snippet, we also iterate through the app routes and save each isr page in the isr array, along with it’s expiration value. We export those values we obtained to the manifest file, which can be then imported using the MANIFEST alias.
The cloudflare specific work is done within files/workers.js, open that file in your code editor and paste this content:
import { Server } from 'SERVER';
import { manifest, prerendered, isr } from 'MANIFEST';
import * as Cache from 'worktop/cfw.cache';

const server = new Server(manifest);
const worker = {
	async fetch(req, env, context) {
		await server.init({ env }); // Initialize server with the environment
		// Check cache unless "no-cache" is requested

		if (req.headers.get('cache-control') !== 'no-cache') {
			const res = await Cache.lookup(req);

			if (res) return res;
		} // Get pathname from the request URL

		const { pathname: rawPathname } = new URL(req.url);

		const pathname = decodeURIComponent(rawPathname) || rawPathname;

		const key = `key_${pathname}`; // Attempt to serve from KV cache

		try {
			const cachedResponse = await env.kv.get(key);

			if (cachedResponse) {
				const cachedHeaders = new Headers({
					'Content-Type': 'text/html',

					'CF-Cache-Status': 'HIT'
				});

				return new Response(cachedResponse, { headers: cachedHeaders });
			}
		} catch (err) {
			// Skip if page is not in cache (we'll render and return the response below)
		} // Determine if the request is for a static asset or prerendered page

		const strippedPathname = pathname.replace(//$/, '');

		const isStaticAsset =
			manifest.assets.has(strippedPathname) ||
			manifest.assets.has(`${strippedPathname}/index.html`);

		const location = pathname.endsWith('/') ? strippedPathname : `${pathname}/`; // Serve assets, prerendered pages, or process dynamic requests

		let res;

		if (isStaticAsset || prerendered.has(pathname)) {
			res = await env.ASSETS.fetch(req);
		} else if (location && prerendered.has(location)) {
			res = new Response('', { status: 308, headers: { location } });
		} else {
			res = await server.respond(req, {
				platform: { env, context, caches, cf: req.cf },

				getClientAddress: () => req.headers.get('cf-connecting-ip')
			}); // If it's an isr page, Store in KV cache if the response is successful

			const isrPage = isr.find((page) => page.pathname === pathname || page.pathname === location);

			if (isrPage && res.ok) {
				const bodyText = await res.clone().text();

				await env.kv.put(key, bodyText, { expirationTtl: isrPage.expiration });
			}
		} // Utilize Cache API for eligible responses

		if (res.status < 400) {
			const cacheControl = res.headers.get('cache-control');

			if (cacheControl) {
				return Cache.save(req, res, context);
			}
		}

		return res;
	}
};

export default worker;
As explained, we store each ISR page inside Workers KV store and set the relevant expirationTtl value. You can access the Workers KV store using the env.kv variable.
In the Cloudflare interface, we are going to use our previously deployed app switching the branch to cloudflare-isr. To set the branch, go to the project page > Settings > Builds & Deployments >
Configure Production Deployments.
You need a KV name-space bound to your project environment, to create one, go to Workers & Pages, KV, and create your name-space, then head to your project page > Settings > Functions > KV name-space bindings, and select the name-space for both Production & Preview deployments, last, redeploy your app for the changes to take effect.
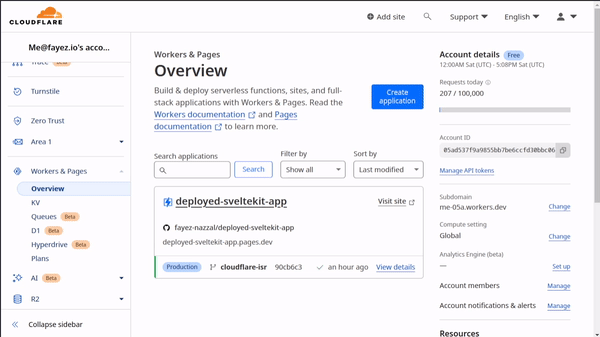
And finally, we got our ISR page working!
A downside of this approach is that our page will still behave like an SSR page in case of SPA, you can work around that by using a hard link for ISR page or disabling csr, though, I don’t see any need of that, ISR pages are usually done to increase speed and minimize traffic, but if your user have already loaded your website that won’t be needed most times and it won’t make that increased traffic you would worry about.
Deploy as a pure static website
Cloudflare Pages also offer support for a fully static website. If your website is purely static, you can use adapter-static and get your website deployed with no backend code execution. Note that in this case your website isn’t any different from any static asset, so it will automatically get distributed to Cloudflare CDN while being cached to your users.
Start by checking out the static branch, installing node dependencies and executing the build script:
git checkout static
pnpm install
pnpm build
adapter-static will generate a build directory generated for you, we explained the file architecture for this directory in Part 2 of the series.
Now all you have to do is push this code and deploy it using Cloudflare pages like we did in the previous part, except that we are going explicitly set the output directory to build and we will get our static website deployed
In closing
It was a long blog post. I hope you have enjoyed reading it as much as I’ve been enjoying writing this, in the next part we are going to deploy a pure static version of our website to AWS S3. See you then!